Enjoy the greasy!
Tag Archives: video
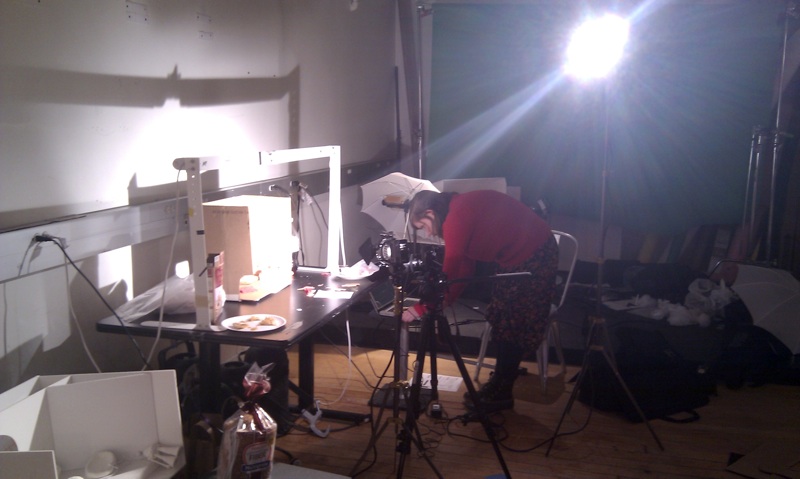
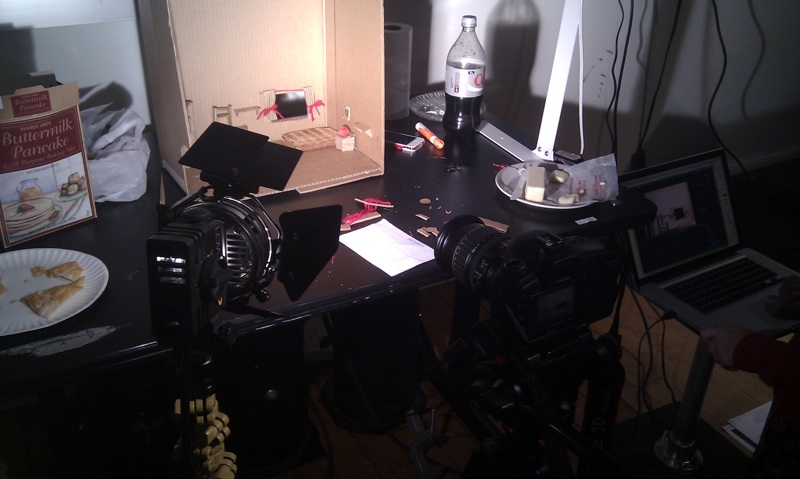
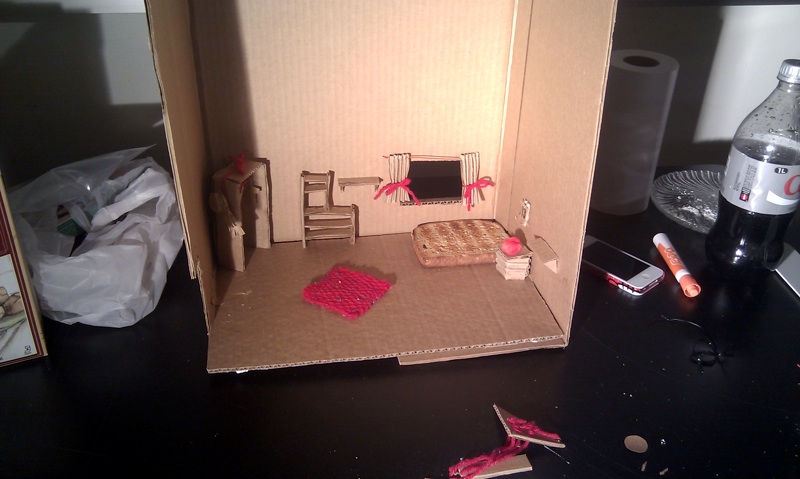
Ani_Butter Test Shot
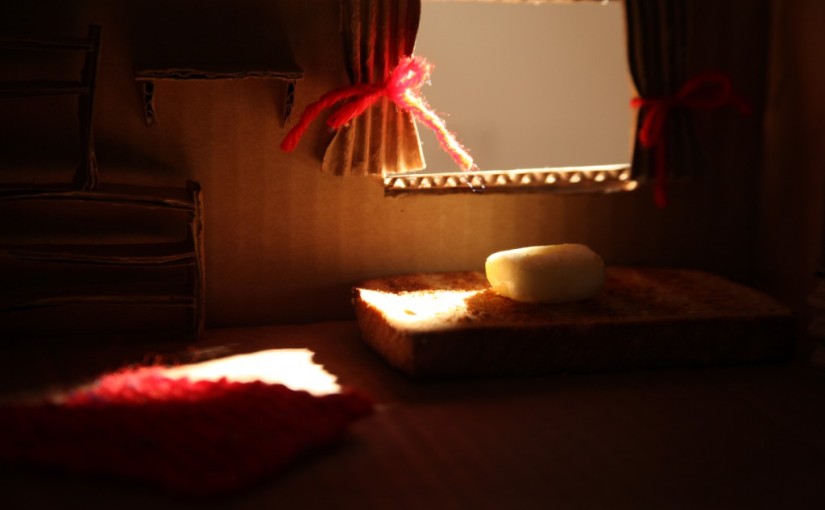
which is totally useable!
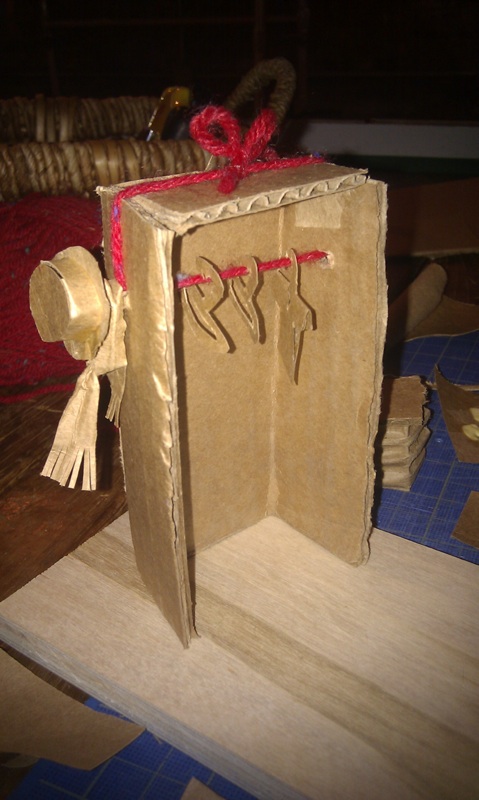
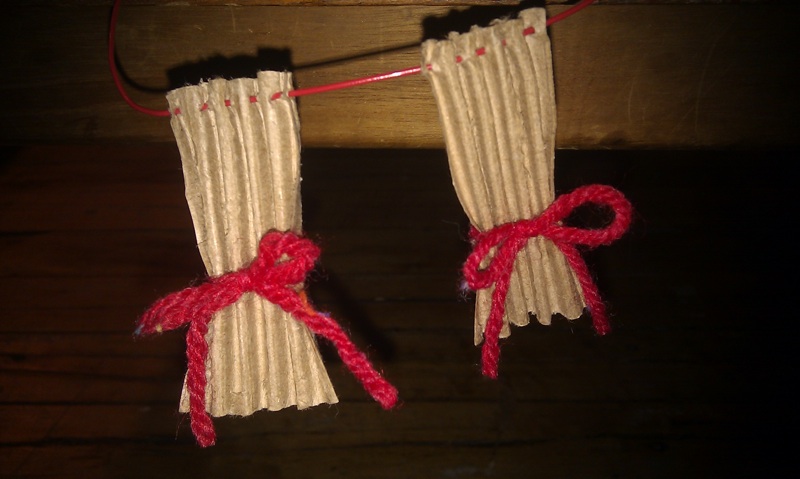
Working on Sunday to pull it off. Setting up took the most of the time, and the filming was definitely less than 1 hour… But it’s totally worth it! What a lovely home of a little cube of Butter. And Kate showed magic to knit the rug. UNBELIEVABLE. It’s a magical world of cardboard and bread 😀
More to come 🙂
ICM_Video_Let’s have Fun!
OpenCV Library


Just tweaking around Daniel Shiffman’s LiveFaceDetect example with OpenCV library. Photoshopped off the face of Mushroom. And I’m proud that I mapped the position and the scale well! So FIT hahaha. Below is my mushroom hat mapping code.
if (faces != null) {
    for (int i = 0; i < faces.length; i++) {
      // image size: 500
      // maps image size with face scale
      float w = map(img.width, 200, 1, 1, faces[i].width);
      float h = map(img.height, 200, 1, 1, faces[i].height);

      image(img, faces[i].x+faces[i].width/2-(w)/2, faces[i].y-(h)/2, w, h);
    }
  }
And here’s the video for it. Fun!
ICM_ToxiclibsTest_VerletString2D


Ahhhh failed to create the electrons flow in light bulb. Planed to
- add some particles around strings
- restrain patterns to fit within the lightbulb, using different canvas
Things worth mentioned:
- I used keyPressed() to change the gravity. Kill the original gravity and use “A, W, D, S” keys to control the direction of force.
ParticleBehavior2D b = physics.behaviors.get(physics.behaviors.size()-1);
physics.removeBehavior(b);
if (key == 'a') {
physics.addBehavior(new GravityBehavior(new Vec2D(random(-0.3), random(-0.05, 0.05))));
}
else if (key == 'w') {
physics.addBehavior(new GravityBehavior(new Vec2D(random(-0.05, 0.05), random(-0.3))));
}
else if (key == 'd') {
physics.addBehavior(new GravityBehavior(new Vec2D(random(0.3), random(-0.05, 0.05))));
}
else if (key == 's') {
physics.addBehavior(new GravityBehavior(new Vec2D(random(-0.05, 0.05), random(0.3))));
}
- Use the color function of Toxiclibs, measure the direction of the spring and then map it into 0~1, and then some crazy codes to set up the color of stroke.
for (VerletSpring2D s: strings) {
  float currHue = map(s.b.sub(s.a).heading(), -PI, PI, 0, 1);
  stroke(TColor.newHSV(currHue, 1, 1).toARGB());
  line(s.a.x, s.a.y, s.b.x, s.b.y);
}
Original version, without vertex to fill the mesh. Looks like seaweeds.
Looks like worms.
And here are some tutorials and examples I found useful!
- Nature of Code by Daniel Shiffman
- SpringPlay by Justin Pinkney
- @ creativeapplications
ICM_ToxiclibsTest_Mushroom
First attempt to use amazing library Toxiclibs, mushroom-like water creatures with big head and jumpy acts. Cursor is an attractor to pull them closer to each other. And it ends up with a beautiful mistake oops.
As you can see, the frame rate of it became super slow because I put addBehavior() in draw() instead of in setup(), or in the constructor of the class. If I didn’t have an office hour with Daniel Shiffman I’d never know! But after I rewrote my codes, having all of the adding-force stuff happen just once, my sketch became less interesting, as below.
PComp_5_Don’t Touch My Cookie!
Fantasy kind of comes to live guys!
After the PComp class, I was inspired to do more about how the communications between Arduino and Processing. I want them to be more instinct, more meaningful, and more related to each other, not just switching on and off. And stay away using MOUSE to control/adjust my work all the time. My works should have their own behaviors patterns, without others tell them what to do. (kind of like users can only have small control/impact on them ;))
So I came out of an idea to control the chocolate spiders amount of my this week’s ICM homework! Since my intention of this project is scaring away people who try to eat it, why not building the interaction based on that? The more you come closer to the cookie(I use photosensor), the more chocolate spiders will come out alive. And the button at Top Left corner will turn red to warn!
And it worked! 😀 The contends and the behavior matched perfectly. First time! Exciting!! And my circuit looked simple as well.

Come out a good/crazy idea, and then execute it well in the most instinct and simplest way. It’s my goal of life now.
Below are my To-Do-Lists that inspired through today’s PComp class:
- Change velocity, acceleration, changes, instead of just position and on-and-off, so when there’s no input(no one using it), animation still runs.
- Different modes with different compositions of inputs. (e.g. Mode A: button 1; Mode B: button 1+2 …)
- Let users feel they control something in an abstract way. (Wwwwooo complicated…)
PComp_4_MusicInstrument
In PComp class Billy and I make a Music Instrument that can adjust the pitch by pressing and tapping. Check this out!
#include "pitches.h"

int lastButtonState = LOW;
boolean switchIsOn = false;

const int threshold = 10;
const int speakerPinNum = 8;
const int noteDuration = 20;

const int potenPinNum = 5;
int volumeAnalogValue = 0;
int volume = 0;

const int potPinNum = 2;
float saveNote;

int note[] = {
  NOTE_C4, NOTE_E4};

void setup() {
  Serial.begin(9600);
  saveNote = note[1];

}

void loop() {

  int buttonState = digitalRead(2);

  if (buttonState != lastButtonState) {
    if (buttonState == HIGH) {
      switchIsOn = !switchIsOn;
    }
  }

  lastButtonState = buttonState;

  if (switchIsOn == true) {

    int pitchRead = analogRead(0);
    int noteRead = analogRead(1);

    float pitch = map(pitchRead, 0, 950, 0, 100);

    if (pitch > 0) {
      note[1] += pitch;
    }
    else {
      note[1] = saveNote;
    }

    Serial.print(pitch);
    Serial.print(" ");
    Serial.println(noteRead);

    if(noteRead > threshold) {
      tone(speakerPinNum, note[1], noteDuration);
    }
  }
}
As for my review for this on Sunday, I made a basic music kit that you can control on/off, volumes, pitches(higher/lower), and tempo. But since it’s a single-note playing machine instead of templates/clip of music triggered one, it makes no difference with the changes of tempo.

And thanks to almighty Moon! I got the idea of setting button-“released” as the command to adjust pitches, so that pitches won’t go crazy because of the unmeasurable amount/time of button-“pressed” when you press the button. Thank you Moon 😀
What I want to do next–
- make chords (office hour w/ resident booked!)
- play continuous clips instead of single notes
- be creative! not just pressing buttons… not interesting at all… go go go!
And here’s the code.
#include "pitches.h"

int lastButtonState = LOW;
boolean switchIsOn = false;

const int threshold = 600;
const int speakerPinNum = 8;
const int switchPinNum = 2;
const int higherPitchPinNum = 4;
const int lowerPitchPinNum = 3;

int pre_higherPitchRead = 0;
int pre_lowerPitchRead = 0;

const int tempoPinNum = 0;
const int noteGPinNum = 1;
const int noteEPinNum = 2;
const int noteCPinNum = 3;

const int noteDuration = 20;

int saveNote[3];
int note[] = {NOTE_C4, NOTE_E4, NOTE_G4};

void setup() {
  Serial.begin(9600);

  // save the original notes
  for (int i=0; i<3; i++) {
    saveNote[i] = note[i];
  }
}

void loop() {

  // on-off switch setting
  int buttonState = digitalRead(switchPinNum);
  if (buttonState != lastButtonState) {
    if (buttonState == HIGH) {
      switchIsOn = !switchIsOn;
    }
  }
  lastButtonState = buttonState;

  // read different notes
  int noteCRead = analogRead(noteCPinNum);
  int noteERead = analogRead(noteEPinNum);
  int noteGRead = analogRead(noteGPinNum);

  // set up duration of notes
  int tempoRead = analogRead(tempoPinNum);
  int tempo = map(tempoRead, 0, 1023, 5, 100);

  // press buttons to make notes go higher/lower
  int higherPitchRead = digitalRead(higherPitchPinNum);
  int lowerPitchRead = digitalRead(lowerPitchPinNum);

  // when switch is on
  if (switchIsOn == true) {

    Serial.print(tempo);
    Serial.print("  ");

    // make notes go higher or lower
    for (int i=0; i<3; i++) {
      if (higherPitchRead == LOW && pre_higherPitchRead == HIGH) {
        note[i] *= 2;
      }
     if (lowerPitchRead == LOW && pre_lowerPitchRead == HIGH) {
        note[i] /= 2;
      }
      note[0] = constrain(note[0], 32, 4192);
      note[1] = constrain(note[1], 41, 5280);
      note[2] = constrain(note[2], 49, 6272);
    }

    // make sounds!
    if(noteCRead < threshold && noteERead < threshold && noteGRead < threshold) {
      for (int i=0; i<3; i++) {
        tone(speakerPinNum, note[i], tempo);
      }
    } else if(noteCRead < threshold && noteERead < threshold) {
      tone(speakerPinNum, note[0], tempo);
      tone(speakerPinNum, note[1], tempo);
    } else if(noteCRead < threshold && noteGRead < threshold) {
      tone(speakerPinNum, note[0], tempo);
      tone(speakerPinNum, note[2], tempo);
    } else if(noteGRead < threshold && noteERead < threshold) {
      tone(speakerPinNum, note[2], tempo);
      tone(speakerPinNum, note[3], tempo);
    } else if(noteCRead < threshold) {
      tone(speakerPinNum, note[0], tempo);
    } else if(noteERead < threshold) {
      tone(speakerPinNum, note[1], tempo);
    } else if(noteGRead < threshold) {
      tone(speakerPinNum, note[2], tempo);
    }

    Serial.print(note[0]);
    Serial.print(" ");
    Serial.print(note[1]);
    Serial.print(" ");
    Serial.print(note[2]);
    Serial.print(" ");
    Serial.println(" ");

  } else {
    for (int i=0; i<3; i++) {      // when swtich-off
      note[i] = saveNote[i];       // restore the original notes
    }
  }

  // remember the previouse higher/lower pitch buttons status
  pre_higherPitchRead = higherPitchRead;
  pre_lowerPitchRead = lowerPitchRead;
}
inspiration_onStreet
2013-09-17 music inspire from JHCLaura on Vimeo.
Seeing this happening on Sep. 17 and it was so lovely. Inspired me to probably make something like that. One man/thing band with beautiful melody. Just love it so.
PComp_3_SuperMarioTime
During the PComp Lab_03, although as struggling as usual, I found it very enjoyable to make the speaker speak! Such a lovely moment, probably as exciting as finding the existence of fire. And I even made a short Super Mario music, sweet!
PComp_Lab_MarioTime! from JHCLaura on Vimeo.
But I found it really difficult, when me and Billy tried to adjust the volume of speaker and also to make chords(two tunes speak at the same time).
For the volume
#include "pitches.h"

int lastButtonState = LOW;
boolean switchIsOn = false;

const int threshold = 10;
const int speakerPinNum = 8;
const int noteDuration = 20;

const int potenPinNum = 5;
int volumeAnalogValue = 0;
int volume = 0;

int note[] = {NOTE_C4, NOTE_E4, NOTE_G4};

void setup() {
  Serial.begin(9600);
}

void loop() {

  int buttonState = digitalRead(2);
  volumeAnalogValue = analogRead(potenPinNum);

  volume = map(volumeAnalogValue, 0, 1023, 0, 490);
  Serial.println(volume);

  if (buttonState != lastButtonState) {
    if (buttonState == HIGH) {
      switchIsOn = !switchIsOn;
    }
  }

  lastButtonState = buttonState;

  if (switchIsOn == true) {

    analogWrite(speakerPinNum, volume);
    Serial.println(volume);

    for (int i=0; i<2; i++) {
      int noteRead = analogRead(i);

      if(noteRead > threshold) {
        tone(speakerPinNum, note[i], noteDuration);
      }
    }
  }
}
My original idea was
- connecting speaker to digital pin #8, and potentiometer to analog pin #A5
- mapping the analogInput from 0~1023 to 0~490, setting it as volume
- analogWrite it into pin #8
But it failed :/
Luckily, I bumped into my 2nd year buddy Andy and bothered him a couple of minutes and his advice simply blown my mind. He suggested using the potentiometer directly between digital pin #8 and the speaker, and adjust it directly without writing any codes! Wow. How I’ve never thought about this? And it worked! It simply proved that I’ve not thought it through totally. Hmmmm so much work to do, fighting 🙂

New codes!
#include "pitches.h"

int lastButtonState = LOW;
boolean switchIsOn = false;

const int threshold = 10;
const int speakerPinNum = 8;
const int noteDuration = 20;

const int potenPinNum = 5;
int volumeAnalogValue = 0;
int volume = 0;

int note[] = {
  NOTE_C4, NOTE_E4, NOTE_G4};

void setup() {
  Serial.begin(9600);

}

void loop() {

  int buttonState = digitalRead(2);
  volumeAnalogValue = analogRead(potenPinNum);

  volume = map(volumeAnalogValue, 0, 1023, 0, 490);
  Serial.println(volume);

  if (buttonState != lastButtonState) {
    if (buttonState == HIGH) {
      switchIsOn = !switchIsOn;
    }
  }

  lastButtonState = buttonState;

  if (switchIsOn == true) {

    for (int i=0; i<2; i++) {
      int noteRead = analogRead(i);
      Serial.println(noteRead);
      if(noteRead > threshold) {
        tone(speakerPinNum, note[i], noteDuration);
      }
    }
  }
}
V&S_02_CookYouAll
Audio recording project of Neva and me!
Do you feel being cooked?
Neva and I wanted to play sound with space and left/right tracks to build up an environment in which the audience would feel being cooked, burned, sprayed on, drank etc..

CookYouAll
Except the intro music and high heels sound, we recorded every pieces in Neva’s place. And then we used Pro Tool to edit. Thanks to the advice from teacher Craig, we edited whole piece at first, and then decided which one goes to Ceiling or Floor, which one goes to right or left soundtrack. And for some of the sound pieces , like rolling, we cut one single sound into pieces, and assigned them one after one into the right and left soundtrack.
In the end, the effect is quite good! We did create a 3D sound effect and it’s really interesting to hear our work delivered by 4 stereos(Much better than listening through computer).
Below are our fun time documentation!


